Shopify integration with PowerHub
The Shopify integration with PowerHub enables automatic order retrieval, product synchronisation and shipment management in one place. Below you will find step-by-step instructions on how to correctly configure the connection.
1. Preparing the application in Shopify (required)
Before starting the configuration in PowerHub, it is necessary to properly prepare the application in the Shopify admin panel.
From the Shopify Administrator account, create (or edit) an application and grant it the appropriate permissions (scopes).
In the application, select the following access scopes:
read_all_orders
read_assigned_fulfillment_orders
read_customers
write_customers
write_assigned_fulfillment_orders
read_custom_fulfillment_services
write_custom_fulfillment_services
read_fulfillment_constraint_rules
write_fulfillment_constraint_rules
read_fulfillments
write_fulfillments
write_inventory
read_inventory
write_inventory_shipments
read_inventory_shipments
write_inventory_shipments_received_items
read_inventory_shipments_received_items
write_inventory_transfers
read_inventory_transfers
write_locations
read_locations
read_markets_home
write_markets_home
read_merchant_managed_fulfillment_orders
write_merchant_managed_fulfillment_orders
read_orders
read_product_feeds
write_product_feeds
read_product_listings
write_product_listings
read_products
write_products
read_shipping
write_shipping
read_shopify_payments_payouts
read_content
write_content
read_themes
write_themes
read_third_party_fulfillment_orders
write_third_party_fulfillment_orders
customer_read_orders
After saving the application, generate the API key (API Key / Access Token) – it will be required in the further configuration in PowerHub.
2. Adding the integration in PowerHub
Go to:
Configuration → Integrations → Add integration → Shopify
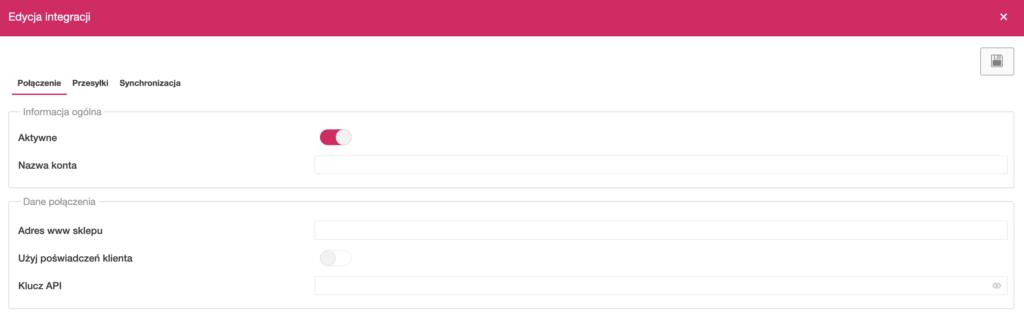
In the Connection tab, complete:
- Active – enable the integration
- Account name – any name (e.g. store name)
- Store website address – your Shopify store address (e.g.
yourstore.myshopify.com) - Use client credentials – optional setting (leave disabled if you are not using your own OAuth data)
- API Key – paste the generated token from Shopify
3. Shipping settings
The Shipping tab allows you to link orders with couriers and shipping templates.
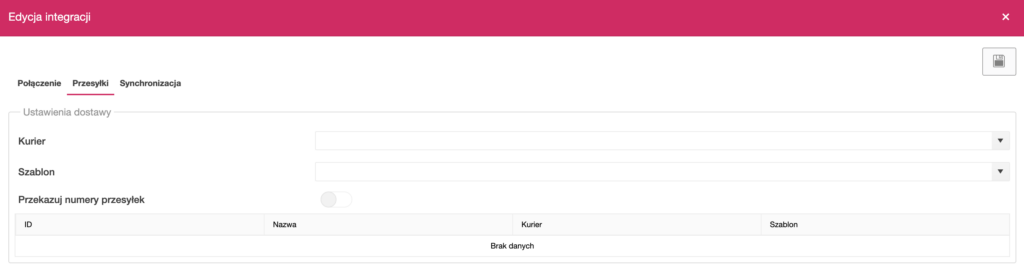
Here you can:
- select a default courier
- assign a shipment template
- decide whether tracking numbers should be sent to Shopify
Additionally, it is possible to create delivery method mappings between Shopify and PowerHub.
4. Order synchronisation
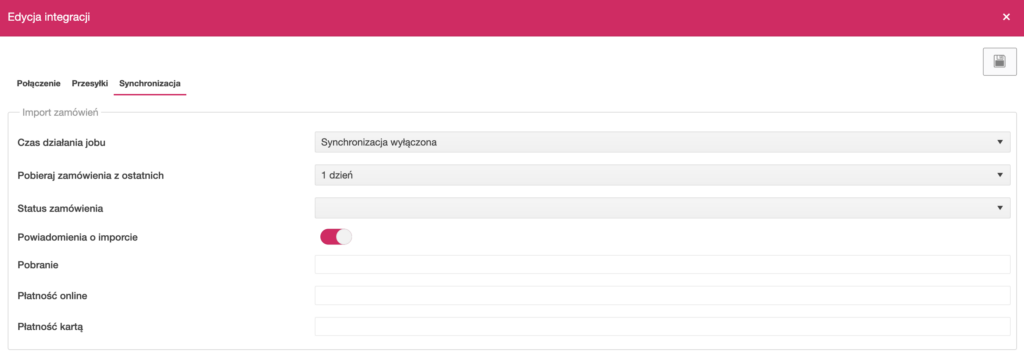
In the Synchronisation → Order import tab, set:
- Job execution time – how often orders should be retrieved
- Retrieve orders from the last – time range (e.g. 1 day)
- Order status – which orders should be imported
- Import notifications – enable/disable notifications
Additional fields allow you to map payment methods:
- cash on delivery
- online payment
- card payment
5. Returns synchronisation

In the Returns import section, you can specify:
- return retrieval frequency
- time range
- default status for new returns
6. Product synchronisation
The Product synchronisation section enables automatic data updates between PowerHub and Shopify.
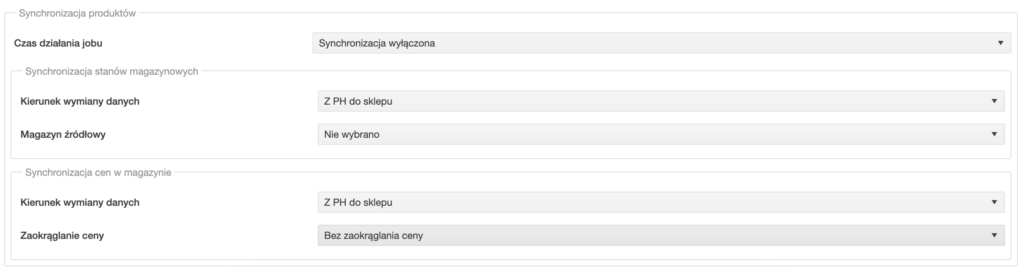
Stock level synchronisation
- Data exchange direction (e.g. from PowerHub to the shop)
- Source warehouse – select the warehouse from which stock levels are retrieved
Price synchronisation
- Data exchange direction
- Price rounding – method of price calculation
7. Saving and launching the integration
After configuring all settings, click the save icon in the top right-hand corner.
Make sure that the integration is active – from this moment, PowerHub will begin exchanging data with the Shopify store according to the settings.
Most common issues
No order import
- check whether the integration is active
- make sure the correct order status is set
- verify the date range for retrieval
Connection error
- check that the shop address is correct (it should be in the format
twojsklep.myshopify.com) - ensure that the API key is up to date
- verify that the Shopify app has all the required scopes